Monday, March 28, 2011

The Compost Bin

Finished compost bin made from recycled fencing.
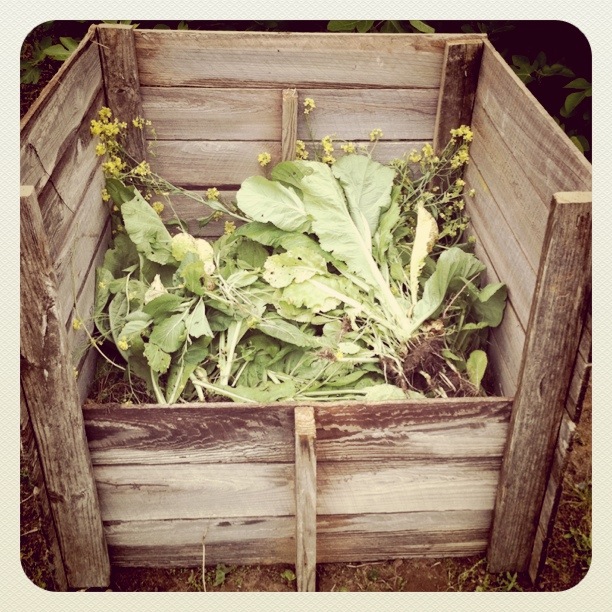
 A few weeks ago my Dad came back from visiting my Grandmother and brought with him a trailer load of old fence panels he'd taken down at her place. They've been stacked up in my back yard since then and I've been thinking of projects to use these for. I'd already made a birdhouse, with my girlfriend, that I was rather proud of because I managed to use every inch of a single plank to make it. Now I wanted to make something bigger and I decided a sorely needed compost bin was in order. Using two panels I made 3 3'x3' sides. It was a simple matter of just sawing the panels to the right size. I nailed these together used some of the leftover boards to make the half high front piece. This piece isn't nailed in but rather just slides into place. That will make it easy to remove when I need to turn the pile and later when I'm ready to shovel out my black gold. I can also slide another half piece on top if and when the pile reaches that high.
These greens are going to be a greater starter
for the pile.
To get the pile started I dug out a bag of carrots and celery that had been sitting in my fridge for way too long and two lonely lemons that never made it into a cocktail. That was a meager start but I also happen to have a row of greens that needed to come up and now can have a second life quietly composting away in the corner of the garden.

So how does a compost pile work? What goes into it? And most importantly, why go to the trouble of having one?

First of all a compost pile is nothing more than the decomposed remains of organic material that has been broken down, by heat, moisture and organisms back into a nutrient rich soil.It completes a cycle in which nutrients from the soil are taken up by the growing plant and then released back when it dies and decomposes. Gardeners can take advantage of this natural cycle by constructing and maintaining a compost bin and working the resulting compost back into their beds and containers.

Growing Rosemary

Rosemary Bush
Rosemary is a hardy, easy to grow evergreen that everyone who cooks should have in there garden or in a container. Not only is Rosemary great to cook with but you can also use them as a fragrant ornamental shrub or even a hedge. Rosemary is drought tolerant and very low maintenance.

Location: Rosemary does great in full sun. Good drainage is a must as the plant does not do well in wet soggy soils.

Harvesting: Just snip the stems back with a pair of sharp scissors when needed. If you also using as a ornamental shrub, prune back into the shape you want and store or use the trimmings.

Storage: Dry and remove the leaves from the stem. Store in air tight containers.


More info on growing Rosemary at About.com

Growing Chives

Chives after a harvest
The subtle onioney aroma and taste of fresh chives is one of my favorite things. I'll even chew on a piece while I'm harvesting it. Cheesey potato soup just wouldn't be the same without a generous garnishing of chives on top. Or, dress up a plain omelet with a few a pinch or two for a tastier breakfast.

Chives are super easy to grow and harvesting is as simple as giving them it quick haircut with the scissors.


More info on growing Chives at About.com

Growing Oregano

Oregano, a favorite, best known as staple in Italian dishes (Greek Oregano) is also an important herb in many southwestern and Mexican dishes (Mexican Oregano). I recommend having both because...well why not?

Location: Oregano thrives in full sun and in well drained soil. Like Thyme, Sage and Tarragon; Oregano does well in a "poorer" soil mix. So avoid the richer, more fertile soil mixes and avoid the fertilizer.

Care: Cutting back sprigs will keep the plant bushier and fuller. Trim sprigs when they 4-6".

Harvest: Trim sprigs when needed. Flavor (from the essential oils in the plant) decrease during and after flowering so harvest before use what you need, dry and store the rest.


More info on growing Oregano at About.com

Growing Basil

Basil is incredibly easy herb to grow that will add great flavor to a variety of dishes.

Young Sweet Basil Plant

Location: A sunny well drained area. Grows well in containers. Makes perfect companion to tomato plants.

Growing: Start in greenhouse or plant outdoors after last frost. When flowers begin to form, remove to promote more leaf growth. Pinch tips back for a bushier plant.

Harvesting: Pinch off individual leaves as needed or cut off tops to encourage bushier growth.

Storage: As with most herbs use as soon after harvesting as possible for best flavor. Basil stores best when frozen.

More info on growing Basil at About.com

Sunday, March 27, 2011

My "Kitchen Garden"

My "Kitchen Garden" of Onions, 
Tomatoes, String Beans, Peppers and Herbs
I'm doing more this year to grow more of my own food. While I don't have the resources (i.e. time and money) to grow all of my food every little bit helps and will add great fresh flavor to my meals.

I should have string beans by the end of April and Tomatoes and Peppers by the end of May.